Bolt Detailing Settings
- Step-By-Step
- Related Tools
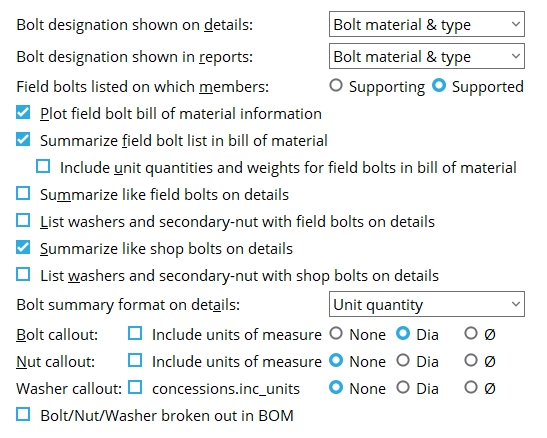
Bolt designation shown on details: Bolt material only or Bolt material & type. This applies to the details of members whose piecemarks you select when you Detail Members. It also applies to any reports based on the bills of material of those subsequently detailed members (for example, Bill of Material Reports).
If Bolt material only is selected, then only the steel grade of bolts will be listed on automatically detailed member details (e.g., A325).
If Bolt material & type is selected, then the type of bolt will be listed along with the steel grade (e.g., A325N, A325TC, A325X, etc.).
Per-drawing setup override for detailing with templates: Bolt designation shown on details
Bolt designation shown in reports: Bolt material only or Bolt material & type. This applies to Field Bolt Reports and Shop Bolts Reports whose data base is the 3D model. For reports based on the member bill of material (e.g., Bill of Material Reports), bolts are designated as they are in the bill of material.
If Bolt material only is selected, then only the steel grade of bolts will be listed on the reports (e.g., A325).
If Bolt material & type is selected, then the type of bolts will be listed along with the steel grade (e.g., A325N, A325TC, A325X, etc.).
Field bolts listed on which members: Supporting or Supported. This applies to certain Field Bolt Reports (other than pt to pt and summaries) generated after you Process and Create Solids. It also applies to bills of material (if field bolts are summarized) after you Process and Create Solids and then Detail Members.
|
Field bolts are shown when the member on which the bolts are listed is displayed in a solid form. |
If Supporting is selected, then field bolts will be listed on the bills of material of the supporting members and grouped together with the supporting member's mark on Field Bolt Reports. Also, field bolts will be shown in Modeling when the supporting member is displayed in one of the three solid forms.
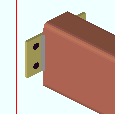
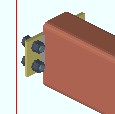
If Supported is selected, then field bolts will be listed in the bills of material of the supported members. In Field Bolt Reports, the field bolts required to erect supported members with the same piecemark will be grouped together in a single row on the report. Also, as depicted in the example above, field bolts will be shown in Modeling when the supported member is displayed in one of the three solid forms
Note: Field bolts are, by default, bolts that are used to erect members at the work site, whereas shop bolts are used to fabricate members in the shop. Field bolts are not permitted to be listed for both supported and supporting members in order to prevent duplication of the total required number of field bolts.
Advanced Selection: m.BoltCount (count in bill of shop and field bolts on a member)
Parametric module: m.BoltCount (count in bill of shop and field bolts on a member)
Plot field bolt bill of material information: ![]() or
or ![]() . This applies when you Plot.
. This applies when you Plot.
If this box is checked (
) and Summarize field bolts list in bill of material is also checked, then field bolt information will be included on the plotted bill of material. This information will be associated with either the supporting or supported member as specified in the field Field bolts listed on which members.
If the box is not checked (
), then field bolt data will not be shown as part of the data compiled into the physical bill of material, nor will it be printed, but the bolt data will continue to be shown in the bill editor so long as
Summarize field bolts list in bill of material is checked.
Summarize field bolts list in bill of material: ![]() or
or ![]() . This applies when you Detail Members.
. This applies when you Detail Members.

If this box is checked (
), then a list of bolts designated to be attached in the field will appear in the bill editor for member details (supported or supporting -- see above). Checking this option before you detail also allows you generate a Field Bolt Listing From Sheet BOM or Field Bolt Summary From Sheet BOM from sheets with those details placed on them. This information, however, will not be printed with a bill of material associated with a particular detail sheet unless Plot field bolt bill info is also checked.
If the box is not checked (
), field bolts will not be summarized in the bills of material of member details. To track field bolts, you can output Field Bolt Reports, Field Bolt Summaries or Field Bolts Point to Point Reports.
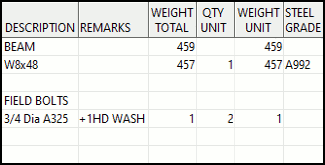
Include unit quantities and weights for field bolts in bill of material: ![]() or
or ![]() . This applies when you Detail Members and
. This applies when you Detail Members and ![]() Summarize field bolts list in bill of material is turned on (checked).
Summarize field bolts list in bill of material is turned on (checked).
|
|
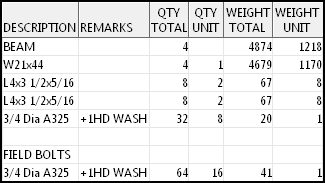
If this box is checked (
), the Unit Quantity Total Weight and Unit Weight columns in member bills of material will include information about any field bolts that are associated with those members.
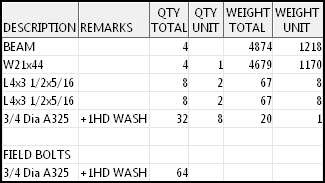
If the box is not checked (
), only the Description Remarks and Total Quantity will be reported for field bolts.
Summarize like field bolts on details: ![]() or
or ![]() . This applies when you Detail Members.
. This applies when you Detail Members.
|
If this box is checked (
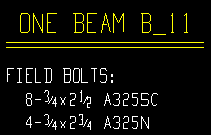
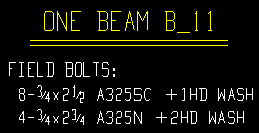
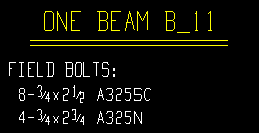
), then field bolts of the same type and size are summarized beneath the callout on member details (as shown above).
Special case: The field bolts are summarized to the right of the member size if the box is checked for Show main member size in General Presentation.
If the box is not checked (
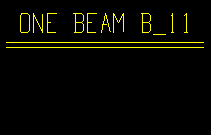
), the field bolts are not called out on the member detail itself, but may optionally be called out in the bill of material.
Per-drawing setup override for detailing with templates: Summarize like field bolts on details
List washers & secondary nut with field bolts on details: ![]() or
or ![]() . This applies when the box is checked for Summarize like field bolts on details. It applies when you Detail Members.
. This applies when the box is checked for Summarize like field bolts on details. It applies when you Detail Members.
|
If this box is checked (
), washers and the secondary nut are listed along with the field bolts on the member detail.
If the box is not checked (
), only the field bolts are listed.
Per-drawing setup override for detailing with templates: List washers & secondary nut with field bolts on details
Summarize like shop bolts on details: ![]() or
or ![]() . This applies when you Detail Members.
. This applies when you Detail Members.
|
If this box is checked (
), then shop bolts of the same type and size will be summarized beneath the callout on member details (as shown above).
If the box is not checked (
), like bolts will be listed separately for both sides of the member.
Per-drawing setup override for detailing with templates: Summarize like shop bolts on details
List washers & secondary nut with shop bolts on details: ![]() or
or ![]() . This applies to the details of any members with shop bolts whose piecemarks you select when you Detail Members.
. This applies to the details of any members with shop bolts whose piecemarks you select when you Detail Members.
|
If this box is checked (
), then washers and the secondary nut will be listed along with shop bolts on automatically detailed member details.
If the box is not checked (
), washers will not be listed on the member detail itself.
Per-drawing setup override for detailing with templates: List washers & secondary nut with shop bolts on details
Bolt summary format on details: Unit quantity or Total quantity or Unit & total quantities. This applies to the details of any members with shop bolts whose piecemarks you select when you Detail Members.
|
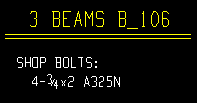
If Unit quantity is selected, the subsequently generated member detail lists the quantity of shop bolts required for the fabrication of a single member (e.g., 4-3/4 x 2 A325N).
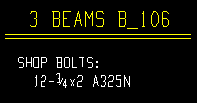
If Total quantity is selected, the detail lists the total quantity of shop bolts used for the fabrication of all members represented on that detail (e.g., 12-3/4 x 2 A325N).
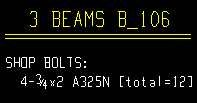
If Unit & total quantities is selected, the detail lists both the quantity of shop bolts for a single member and the total quantity for all members (e.g., 4-3/4 x 2 A325N [total = 12]).
Per-drawing setup override for detailing with templates: Bolt-quantity summary format on details
Bolt callout: This applies in the Drawing Editor when you perform a Material Callout operation and select a system-generated bolt. Also, the Bolt designation type must be set to Bolt size and type on the Edit Label window. This also applies to the bolt summary of details of any members with bolts whose piecemarks you select when you Detail Members. The box for Summarize like shop bolts on details or Summarize like field bolts on details must also be checked. This also applies to the bolt's Description in the bill of materials.
|
|
Units of measure +
None instructs Material Callout to call out the diameter and length of the bolt, but not to designate the units or include "Dia" or "ø". (e.g., 3/4x2 A325N BOLT).
Units of measure +
Dia instructs Material Callout to call out the diameter and "Dia" and the length of the bolt, but not to designate the units. (e.g., 3/4Diax2 A325N BOLT).
Units of measure +
ø instructs Material Callout to call out the diameter and "ø" and the length of the bolt, but not to designate the units. (e.g., 3/4øx2 A325N BOLT).
Units of measure +
None instructs Material Callout to call out the diameter and units and length of the bolt, but not include "Dia" or "ø." (e.g., 3/4inx2 A325N BOLT).
Units of measure +
Dia instructs Material Callout to call out the diameter and units and "Dia" and the length of the bolt.
(e.g., 3/4inDiax2 A325N BOLT).
Units of measure +
ø instructs Material Callout to call out the diameter and units and "ø" and the length of the bolt.
(e.g., 3/4inøx2 A325N BOLT).Per-drawing setup override for detailing with templates: Bolt callout > Include units of measure and Bolt callout.
Nut callout: This applies in the Drawing Editor when you perform a Material Callout operation and select a system-generated nut that does not have a bolt associated with it. This also applies to the nut's Description in the bill of materials when you Detail Members.
|
|
Units of measure +
None instructs Material Callout to call out the diameter of the nut, but not to designate the units or include "Dia" or "ø". (e.g., 3/4 NUT).
Units of measure +
Dia instructs Material Callout to call out the diameter and "Dia" of the nut, but not to designate the units.
(e.g., 3/4Dia NUT).
Units of measure +
ø instructs Material Callout to call out the diameter and "ø" of the nut, but not to designate the units.
(e.g., 3/4ø NUT)
Units of measure +
None instructs Material Callout to call out the diameter and units of the nut, but not include "Dia" or "ø."
(e.g., 3/4in NUT).
Units of measure +
Dia instructs Material Callout to call out the diameter and units and "Dia" of the nut. (e.g., 3/4in Dia Nut).
Units of measure +
ø instructs Material Callout to call out the diameter and units and "ø" of the nut. (e.g., 3/4in ø NUT).
Per-drawing setup override for detailing with templates: Nut callout > Include units of measure and Nut callout.
Washer callout: This applies to the washer's Description in the bill of materials when you Detail Members.
Units of measure +
None instructs Detail Members to call out the diameter of the washer, but not to designate the units or include "Dia" or "ø". (e.g., 3/4 WASHER).
Units of measure +
Dia instructs Detail Members to call out the diameter and "Dia" of the washer, but not to designate the units.
(e.g., 3/4Dia WASHER).
Units of measure +
ø instructs Material Callout to call out the diameter and "ø" of the washer, but not to designate the units.
(e.g., 3/4ø WASHER).
Units of measure +
None instructs Detail Members to call out the diameter and units of the washer, but not include "Dia" or "ø."
(e.g., 3/4in WASHER).
Units of measure +
Dia instructs Detail Members to call out the diameter and units and "Dia" of the washer. (e.g., 3/4in Dia Nut).
Units of measure +
ø instructs Detail Members to call out the diameter and units and "ø" of the washer. (e.g., 3/4in ø WASHER).
Per-drawing setup override for detailing with templates: Washer callout > Include units of measure and Washer callout.
Bolt/Nut/Washer broken out in BOM: ![]() or
or ![]() .
.
|
||||||
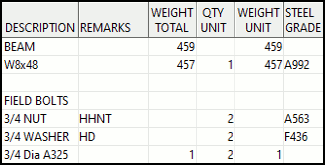
| These examples are taken from a member's bill of material. To open a particular member's bill of material (bill editor), start up the Drawing Editer > open the desired member detail > choose Edit Bill. |
If this box is checked (
), then bolts, nuts, and washers will, by default, be called out as separate line items in the member bill of material's Description column.
If the box is not checked (
), then bolts, nuts, and washers will, by default, be called out as a single line item in the member bill of material (BOM).
Defaults: The choice made here sets the default for Bolt/Nut/Washer broken out in BOM on the Bolt Edit window (Modeling), which in turn sets the shop bolt default for Bolt/Nut/Washer broken out in BOM on the Bolt Edit window (Drawing Editor). The choice made in Modeling can override the choice made here for all bolts (shop or field), and Detail Members looks to the choice made in Modeling to determine whether or not to "break out" bolts in the BOM. Since only shop bolts are shown on member details in the Drawing Editor, the choice made in the Drawing Editor can override the choice made in Modeling for shop bolts only.


|
|
OK (or the Enter key) closes this screen and applies the settings.
Cancel (or the Esc key) closes this screen without saving any changes.
Reset undoes all changes made to this screen since you first opened it. The screen remains open.
